Thursday, May 2, 2013

MY POTATO SPRUNG A LEAKY SOUP

Leona says, "Delicioso"        Melissa says, "Good one Mom!"

Hello to our Foodies out there in Kitchenland, yes, it is that time again....come on you know...AH I see that light bulb just turned on. ......yep you guessed it....LEONA'S FAVORITE THROW IT IN A POT DAY!!!! How many times do I have to say, "I LOVE THIS DAY!" ...LOL I know I know probably to many times that you get tired of hearing (seeing) it, but I do love this day cause I don't have to really measure anything, unless (insert air quotes as you read the next two words) THE MELISSA is watching (this is where Leona turns her head left and right to see if Melissa is watching) .....oh heavens to mer-ga-troid.... she is, dag nab it... that girl has "MY MOM IS ABOUT TO NOT MEASURE SOMETHING" radar!!!! EGADS I am going to start calling it Mdar from this day forward. Love you Miss! (even if you spoil my fun.....hehehehe)

We had this massive amount of potatoes just laying around here just begging me to do something with them...... so I did. Below is my version of a potato soup, please remember I have a BIG family so I tend to cook large amounts to accommodate their appetites. For smaller families just cut down the measurements. We welcome all comments, ideas and suggestions and would love to hear from you.

My Potato Sprung a Leaky Soup
 
Equipment needed:
Soup pot - my favorite is my Paula Dean stock pot
Your favorite knife
Measuring spoons (please take note Melissa..hahaha)
1 cup measuring cup
Food processor (use a potato masher, hand mixer or blender if you don't have one)
 
Ingredients:
5 pounds of potatoes peeled and diced
1 pound of smoky ham or 1 pound of bacon or use both your choice- diced up
3 32 ounce cartons of chicken broth - we used low sodium fat free
1 can of coconut milk
64 ounces of water - fill one of the cartons of chicken broth up 2 times
1 leek - rinsed and sliced up
1 onion cut up
2 avocados - mashed up
1/2 a bag of fresh spinach - chopped up small without the stems - optional
All the celery leaves and the yellow green stalks of celery including the leafy heart of 1 bunch of
      celery-chopped up
2 tablespoons of minced garlic
4 tablespoons of margarine if using just ham as your meat - we use Nucoa (dairy free)
2 tablespoons of dill weed or fresh dill
2 tablespoons of salt
1tablespoon of pepper
2 tablespoons of original Ms. Dash salt free (optional)
 
NOTE:
All of our recipes are dairy free so we use many things to achieve that creamy goodness that milk products give. Avocados and coconut milk are great substitutes plus they add a dimension to the flavor. I snuck the avocados in knowing that Melissa's family doesn't like them. Trust me they couldn't even tell they were in there and of course I didn't tell them either...however, I did tell Melissa and she was shocked cause you couldn't taste them. Our Motto is "What healthy goodness can we sneak in, get away with, the hard part--> remember and use again!" All in the name of LOVE!
 
Cooking instuctions:
Use your soup pot to sauté 1 cup of Ham (if using bacon cook it all), leaks, onion, celery, garlic, spinach (optional) and 4 tablespoons of margarine unless you are using bacon, bacon makes its own grease. Cook until onions celery and leaks are tender and if using bacon make sure it is done. You may have to add a little chicken broth to keep veggies from burning.
 
Add all the liquids, dill, seasonings, potatoes and simmer until potatoes are tender.
Please remember that you need enough liquid to cover the potatoes and a little extra to compensate for liquid evaporation during cooking.
 
Take out 3 cups soup try to get mostly potatoes and veggies drain the juice back into the pot. Make sure that you have 3 cups of potato/veggie mix and set aside.
 
Add in the rest of the Ham (unless you are using all bacon) and the mashed Avocado to the soup pot, stir to combine and continue to simmer soup.
 
Take the 3 cups of potato mixture that you set aside and puree it using whatever equipment that you have- I used a food processor. Add this back into the soup pot stir to combine. Hopefully this will thicken up your soup so it isn't to thin.
 
Taste your soup and add more seasonings if you need to.
This soup has a delicate flavor so if you find the flavor lacking just throw in what you think will make it taste good to you and let us know.
 
If your soup is thinner than you would like, try one of these thickening methods:
Flour and water- should be kind of thick
cornstarch and water- be careful not to get it too thin
potato flakes - I used this and it works great
 
From my stove to your table, eat and enjoy......


Sunday, April 14, 2013

The Wild Side of Rice

     In our house, we love rice. It goes with just about anything, can be cooked about a billion different ways, and is great plain. In the past, we found Jasmine rice and decided that its taste was superior to other types of rice. Recently, we have been trying other types of rice that weren't so processed and had natural health benefits. While shopping at an Asian market, we stumbled upon Vivo's Rice blend. It is a combination of Red, Black, and Brown rices with wheat and oats. We weren't quite sure what to do with it, so we decided to experiment (we wouldn't be us if we didn't!). After coming up with this recipe, we went to a popular Thai restaurant and found it on the menu as "black and white" rice. It was nice, I just prefer it this way.
     This dish tastes just how I imagine a risotto would (I have never tried risotto since every recipe I have come across has milk of some kind in it). It has a light nutty flavour and a creamy mouth feel (a luxury to those of us who have had to do without milk,products).


3 cups Vivo Rice
5 cups chicken stock (we used water and chicken bouillon granules)
2 cups mushrooms, sliced (we used crimini and baby bellas)
rice cooker

All you have to do is load all ingredients into the rice cooker, putting in the mushrooms last. 25- 30 minutes later its YUM time! Please note, Yes this rice looks purple in the picture. Yes it really does cook up purple. My (Melissa's) kids thought it was pretty cool to eat something purple as they believe there is a grave shortage on purple edibles. Enjoy!

Thursday, April 11, 2013

Tangelo Fish A Go-Go

     As you may know, we have fish every Friday, 'cause its Fishy Friday. It has come to our attention that we have yet to post any fish recipes. This is simply not acceptable behaviour. So here is a recipe Melissa made all on her little lonesome. It has a nice flavour and pairs well with rice and asparagus.


Ingredients:
1 steal head or other fish fillet
2-3 Tangelos (navel oranges work as well) sliced 1/4 in thick
1/2-1 cup orange juice
3 scallions thinly sliced into rings
3 cloves of garlic, minced
salt and pepper
aluminium foil

  • Preheat oven to 350. While oven is preheating, place fish on aluminium foil. Salt and pepper to taste (we use freshly ground sea salt and pepper so it is hard to measure). Lay down a layer of scallion rings followed by a layer of minced garlic, and then another layer of scallion rings.
  • Next, place a layer of tangelo slices. I like to cut the peel off of the tangelos because citrus peel tends to make the fish bitter and because I like to leave the tangelo on the fish after cooking, so it is easier to eat the slices if they are pre-peeled.
  • Fold aluminium foil up around top and sides. Pour orange juice over fish until it is covered a little over half way. Next, close the foil around the fish. I usually meet the sides up and fold down towards fish and then roll up the ends. Bake until center is opaque and fish is flaky.

Saturday, April 6, 2013

Kitchen Land's Guide to Storing Fresh Produce

     Since we have started participating in the Bountiful Basket Co-Op, we have ran into the problem of how to store fresh produce to keep it its freshest. Every weekend, we are getting $20- $60 of fresh produce all in one go. in the past, we would only get what was needed for a meal or what could be quickly eaten. This made frequent trips to market and and we would spend $60+ per trip. This made eating a very expensive venture. That is why we started participating in the Bountiful Baskets organization. We try to severely limit our weekly purchases and stick to eating only the produce that is available through them (quite the challenge some weeks). Here is some methods we have found for keeping produce its freshest and most enjoyable. For best results, choose only the freshest produce before trying to store produce. Check in every so often because we plan on updating this as we learn more about fresh produce.

Apples-  There are a couple of different methods. Our favorite is to keep them in the Garage (ours stays pretty cool), making sure that they are all bruise and blemish free. For those of you who do not have a cool, dark place (like a garage or basement) a tightly sealed bag in the fridge is best. Do not wash before storing.
Asparagus- Cut the bottom inch off of stocks and store up right in a container of water in your fridge. Change water if it gets cloudy. Keeps asparagus fresh for about 7 days.
Arugula- If purchased with roots on, Wrap in a damp paper towel and place in a plastic bag. Put this in the most humid part of the fridge (the veggie crisper drawer).
Bananas- The counter top is the best place for this. If your bananas are already yellow, prolong their life a little by separating them from the main stem.
Basil and other fresh herbs- keep upright in a container of water (like you would flowers) OUTSIDE of the fridge. We keep ours in the window. They will grow roots! We have talked about planting the sprouted leaves, but eat them before we get around to it.
Bok Choy- Cut the bottom root section off the stems. Place in a bowl of cold water for about half an hour. Swirl to clean, remove from water and blot dry. Place leaves on clean, a clean, dry paper towel. Roll up leaves in the paper towels and store in a plastic bag.
Broccoli- Cut into florets and keep in a sealed plastic bag. Also, placing florets in a bowel of water in the fridge is nice for snacking.
Cabbage- remove any wilted outer leaves. Rinse and let drain in a colander. Wrap tightly in plastic wrap. Will store well in fridge for up to two weeks. Please note: Once you have cut or scored cabbage leaves, the vitamin C depletes with in 48 hours. So for maximum health benefits, once you cut into your head of cabbage, eat within two days.
Carrots- Using only fresh bright carrots, rinse well in cold water and store in a large bowel with enough water to cover carrots, cover tightly with a lid. Change water every four days. Carrots will stay fresh for two weeks.
Cauliflower- Cut into florets and keep in a sealed plastic bag.
Celery- after trying many different methods, we have found that placing celery in a tightly closed plastic bag keeps it the freshest. This works whether it is cut off the root base or kept intact. The key to storage is keeping moisture out (so no prewashing for best results). Can keep fresh for up to two months.
Cilantro- Place upright in a container (we use a drinking glass) with about an inch of water. Cover tops with a plastic sandwich bag and keep in fridge.
Garlic bulbs- Keep in a cool, dark place that is free of moisture. The refrigerator is not a good place. Think pantry or garage (if yours stays cool). Some people like to keep theirs under a clay pot. This will inhibit sprouting. Once you break into the bulb and start using the individual cloves, the garlic will start to age faster.
Ginger- OK, this sounds weird, but we store our ginger in a pot of organic soil and water it when ever the soil dries out. As we need some ginger, we just dig it up, break off a piece and cover it with soil. If you think about it, ginger is really just a root, so it makes sense.
Green Onion- Place  upright in a container (we use a drinking glass) with about an inch of water. Cover tops with a plastic sandwich bag and keep in fridge. Keeps crisp for 7- 10 days.
Green, yellow, red, or orange peppers- these store well in the crisper section of your fridge. Just be sure that they are free of paper or plastic bags to ensure good air flow. Freezing is supposed to be a good option, we will get back to you on that.
Kale- Wash off all dirt and sand. Shake off excess water and wrap with dry paper towels. Can store well for 3- 5 days.
Radishes- if purchased with greens on: cut greens off, wrap in damp paper towel and place them (the greens) in a plastic bag (great if added to soups or for juicing). Rinse radishes and keep in a plastic bag.
Strawberries- believe it or not, strawberries store best if kept at room temperatures. Just be sure to remove the moldy ones, do not prewash, and place a dry paper towel at the bottom of the container you with to store them in.

Wednesday, April 3, 2013

Humorus Hummus

Well we, Melissa and I, decided to make hummus from scratch little did we know that it could take all day (hench the humor). We should have known!! We gave each other THAT kind of look that only can say, "since when do we ever do anything that starts simple and ends simpler....NEVER!" Ok maybe...um mm....only once and that was because we had way tooo much sex on the beach (naughty you, hehehe, it is a delicious alcoholic drink) and couldn't remember what we were gonna do nor did we care. That was the day that my hubby became the hunter as opposed to the gatherer went and got KFC to protect his family from us, gee you would have thought we actually planned it so we could have the night off of cooking. We aren't telling either. But here I digress (I seem to do that alot) so I need to press on with this delicious recipe.

Hummus is made from chick peas/garbanzo beans (same bean just called by a different name in some cultures), tahini (a paste made from sesame seeds and olive oil), garlic, lemon juice, water and salt. Sounds simple enough UNLESS you are us! How did we manage to complicate such an easy peasy recipe you ask? Welllllll we didn't go to the store and buy Hummus....oh and the only thing we didn't make was the tahini (I can't remember why either) we bought this from an international food market but do plan on making it from scratch in the future. I have included a recipe at the end just in case you feel adventurous.

Humorus Hummus
Leona says, "Yummers"   Melissa says, "What she said"
 
Equipment needed:
Food processor or blender- I used a processor
Soup pot-for cooking dried beans in
Measuring spoons
Measuring cup- to hold water
Spoon- for scraping sides of processor bowl 
Container with a lid- to store your Hummus in
 
Ingredients: scratch measurements shown first- can/shortcut equivalent recipe in ( ) 
4 cups home cooked chickpeas/garbanzo beans- (2- 15/16oz cans- drained, reserving liquid)
2 cups reserved liquid or use tap water
The juice of 2 fresh lemons, at least 7 tablespoons of liquid- (3-5 tablespoons lemon juice) both
          measurement are to taste
1 1/2 tablespoons of Tahini or to taste. Tahini adds a very nice nutty flavor I used 3 tablespoons
1 whole head (with lots of garlic cloves on it) of oven roasted garlic- (3 fresh cloves of garlic or 2
           tablespoons minced or garlic powder) both measurements are to taste
1/2 teaspoon of salt or to taste
2 tablespoons of olive oil- used for drizzling over portioned hummus
 
Pre-prep:
Cook dried chickpeas/garbanzo beans according to package- all we used was water (we didn't want any stray flavors mucking up our hummus, besides we are watching our sodium intake). When beans are tender, drain and reserve liquid. Refrigerate until cool-takes about an hour.
 
While beans are cooking you can juice the lemons and oven roast the garlic
 
To juice fresh lemons- I start with room temperature ones, then roll them on the counter before I cut them. This makes them real juicy. Cut into 3rd, squeeze and reserve juice. Melissa used a spoon to help get out any remaining goodness. If some pulp gets in the juice flavor BONUS!
 
We chose big heads of garlic with lots of garlic cloves on it cause we use a lot of garlic plus it stores well in the refrigerator for later uses. Oven roasted garlic taste mild and sweet so it is hard to use to much...or so Melissa says and since we haven't had any complaints, I'm gonna trust her on this one. For those who don't know how, look under the link "oven roasting veggies". Once they are roasted releasing the cloves from the husk is a bit of gooshy fun. Pull a husk from head, be careful not to smash it, then gently squeeze one end and it pops out the other. I used the whole head.
 
To make:
Put 4 cups of garbonzo beans in processor blend until ground up
Add 1/4th cup of reserve liquid, 7 tablespoons of lemon juice, salt, 3 tablespoons Tahini and roasted garlic to processor. Blend until thoroughly mixed and smooth using reserve liquid as needed.  Stop frequently to scrape down sides, taste test and adjust. The consistency should be thin enough to pour but thick enough to scoop.
 
Portion then drizzle with olive oil- can put a wedge of lemon on the side. Melissa likes to put a pepperchini on hers.
 
Use warm peta bread to scoop up the creamy goodness with.
 
_________________________________________________________________________________
 
Here is another Hummus that we made that same day and we liked it so much it didn't last long, we WILL be making it again.
 Popeye the Hummus man


Ingredients: scratch measurements shown first- can/shortcut equivalent recipe in ( )
4 cups home cooked garbonzo beans- (2 cans (15oz each) drained, reserving liquid)
1 cup chopped fresh spinach leaves
1/4th cup Tahini
1 whole head (with lots of garlic cloves on it) of oven roasted garlic- (3 fresh cloves of garlic or 2
             tablespoons minced or garlic powder) both measurements are to taste
The juice of 2 fresh lemons, at least 7 tablespoons of liquid- (3-5 tablespoons lemon juice) both
             measurement are to taste
2 tablespoons of olive oil
1/2 teaspoon salt
1 tablespoon Fenugreek- this adds such a yummy flavor but more is not always better, trust us on this
             one... we bought this at an international food market
 
Combine beans, garlic, spinach, tahini, fenugreek and olive oil in processor, blend. Add lemon juice and salt blend again. Start adding small amounts of reserve liquid or water while blending until desired consistency.
 
__________________________________________________________________________________
 
Now for all you adventurous viewers here is a recipe for Tahini
 
Tahini
5 cups sesame seeds - toasted or untoasted
1 1/2 cups olive oil
 
To toast untoasted sesame seeds
 
Preheat oven to 350. Spread sesame seeds on a cookie sheet to make a single layer. Don't grease sheet. Put in preheated oven toast 5-10 minutes, turning seeds frequently with a spatula.
 
Pour sesame seeds into a food processor, add olive oil. Blend for 2 minutes. Check for consistency. The goal is a thick, yet pourable texture. Add more oil if needed.

Storing Tahini
Tahini should be stored in the refrigerator in a tightly closed container. It will keep for up to 3 months.
 
We welcome all comments and ideas. 


Tuesday, April 2, 2013

A Lovely Bunch of Coconuts

    Have you ever been shopping in the produce section of the store and been enticed by the exotic appeal of a coconut? Have you ever purchased said coconut and the only idea you had for using it is to cut it in half and use it to make horsey clop-clop sounds while singing "I have a lovely bunch of coconuts"? If this is any where close to a real life scenario, you are in luck! Recently, I have had the challenge of figuring out the other uses of a coconut.

   It is not easy harvesting the delicious meat of a coconut, but at the end of the day, you have a feeling of accomplishment and some coconut meat and milk that is 100% additive free. Here are some step by step instructions to get more out of your coconut than some mildly hilarious  entertainment.You will need the following items for the next couple of steps:
  •  a large bowl
  •  a thick bladed, heavy knife
  •  a short, thin bladed knife that is kind of flexible blade
  •  a blender or food processor
  • cheese cloth or other natural fibre cloth like a nut bag (I use cheese cloth)
  • and oh yeah, a coconut )
  • a cookie sheet and jar or glass for the coconut milk might also come in handy

1. Picking the right coconut. You want to pick a coconut that is lighter in colour. The darker the coconut, the older it is, the younger the coconut, the better the flavour. Check to make sure there are not any external cracks or wet spots on the coconut, if you see these, your coconut could be compromised, don't buy it! You need to shake the coconut to make sure there is plenty of coconut water inside, this is kind of a must have for making coconut milk (you can make coconut milk without it, but the taste is superior if you can use it).

2. Locate the eyes on your coconut. There should be three indentations on it, one is softer. the softer one is where the stem was once attached. Some people like to take a drill bit and drill into the coconut and drain the water. (You can do this, but I think it is unnecessary). I think of the soft indention as the nose and the two parallel indention as the eyes. Holding Mr.Coconut over the large bowl, use the back, flat end of your heavy knife, whack Mr.Coconut squarely between the eyes. If you get mixed up, or really can't tell what is eyes and what is not, don't worry, just whack anyways. Your coconut will start to crack. and liquid will start to leak out. The liquid is coconut water and is very tasty. Collect as much of this in your bowl as possible. Rotate and give the coconut a good whack along the crack you have created until your coconut is opened enough to pull apart. Did I mention you might not want to try this after putting the kiddos to bed or down for a nap? It is kind of loud.

3. Using the smaller, thinner bladed knife, pry the coconut meat from the shell. The coconut is round and the blade is flat, that is why you want it to be flexible, so it kind of curves with the shell. Be very careful to not a) break your blade or b) stab your hand >cough, cough<. I have found that giving the knife a little wiggle will help release the meat from the shell. You will notice that some of the brown membrane of the coconut sticks to the coconut meat. There are two schools of thought on what to do about this. Some people say that it is good for you and to leave it on and others say to peel it off. I leave it on but peel off the thicker parts that look like they would be hard to bite into.


4. Shred your coconut. you can do this with a grater, or a food processor using the shredding attachment. I do this in my food processor with the grating attachment but it comes out a little rough. If you have your heart set on beautiful coconut flakes that you can buy in the store, I recommend using a hand grater You want to combine the coconut water with the coconut meat, bit by bit. If you didn't collect enough coconut water to maintain a good pulse, you can add regular water. Keep adding water and coconut meat and pulsing until you have a nice, chunky puree

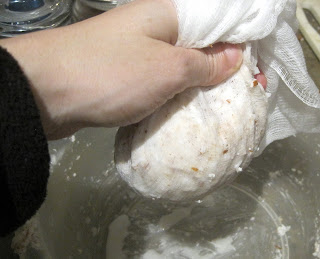
5. Pour the coconut puree mixture into a bowl and, using the cheese cloth, start straining the mixture into a bowl or desired storage container. The way you do this is by placing handfuls of the puree into the cheese cloth and then squeezing out as much of the mixture as possible into the container. You will have a bunch of coconut meat left in the cheese cloth. Put this onto the cookie sheet, and continue to process the the coconut puree through the cheesecloth. Let the coconut meat dry out on the cookie sheet.


6. Now you have fresh coconut milk and some shredded, unsweetened coconut!

I like to use the coconut in just about any curry dish. The coconut meat can be used as you would store bought unsweetened coconut flakes, or if you have bigger chunks, as nuts in most any recipe for a light, nutty flavour.

Thursday, March 28, 2013

Drumming to the Beet Chicken Soup


“Throw it in the pot” is one of my favorite ways to cook, that is why I lay claim to this day, you just throw whatever in the pot add tons of spices that you think will make for a tasty treat and whammo you have a masterpiece just waiting to be eaten. No measuring (yahoo) a basic no fuss way to cook….unless you have my daughter Melissa living with you. She is such a stickler for measuring and writing stuff out, “Mom, how do you re-make this if you don’t measure things out or write it down?” In the first place what makes her think I want to make it again the same way and in the second place it rains on my “creativity” OF COURSE I don’t say these things out loud I may be dumb but I ain’t stupid. This does lead to some pretty good in my head conversations and retorts like “didn’t your momma ever teach you that it isn’t polite to correct your momma” or “you can’t imagine what I’ve been doing behind your back” snicker…snicker, just kidding Melissa (Not).

 To be honest, she does have a point about writing down recipes and yes, doing the measuring thing how else would I be able to give you great recipes from the land of Leona.  So here is my latest throw it in the pot soup for an army. To scale down cut everything by half.

Drum to the Beet of Chicken and Veggie Soup

I say, “Start small end BIG!”  Melissa will say, “She isn’t kidding!”

Ingredients:

3 boneless skinless chicken breast (thighs are OK too but use 6 cause they are smaller)-leave whole

1 fresh raw beet-peeled and diced up – we got this from our bountiful basket

4 medium sized potatoes diced up

2 carrots peeled and diced up

1 gallon of water to start but will need more

1 carton chicken broth – I use the low sodium 98% fat free kind

1 large onion diced

1 bunch of celery- I use only the leaves and the little white stalks from the inside (these are the parts that usually get thrown away and I think are the most tastiest in soup) chopped up

2 cups each: frozen corn and peas  

1 large can of diced tomatoes juice and all

Salt to taste- some like more, some like less

Pepper to taste-some like more of a kick, some like less

Now for the seasonings, I use a variety from Mrs Dash, McCormick’s Perfect Pinch, McCormick’s Gourmet Collection and the good old Walmart brand 5th Season. I like to cover my bases with flavor and believe it or not these are staples in our house. If you don’t have any of these, just use what you have that is close to how you want it to taste.

Mrs Dash Salt Free seasonings: 2 Tablespoons each

Chicken chilling blends

Italian Medley

Tomato basil garlic

McCormick’s Perfect Pinch No MSG: 2 Tablespoons each

Savory All-Purpose

Tuscan

Original Chicken

McCormick’s Gourmet Collection: 1 Tablespoon each

Moroccan Seasoning (not only does it taste good, it smells good too!)

Smoky Paprika- (optional)

Walmart brand 5th Season: 1 Teaspoon each

Garlic Powder- can use fresh or minced garlic instead, I’ve used all three in the same meal but at different cooking stages

Onion Powder- to help give it more flavor but you can leave it out

UTENSILS THAT YOU WILL NEED:

1 large (huge) soup pot- she ain’t kidding

Can opener- I say this as a reminder to us cause we keep losing ours…no lie

Your favorite cutting knife- I have one doesn’t everybody…lol

Cutting board

And a good spoon for stirring – and for smacking smart alecks with…he he he

NOW FOR THE ASSEMBLY (I know that you are all thinking verbally OK Leona get on with it no wonder you drive Melissa crazy! I say it is a short trip some days….OK, OK I digress)

Put your pot on the burner on MED. Add a small amount of chicken broth to the bottom of pot. You are going to be “frying” the onion and celery in this for two minutes stirring frequently.

Add the chicken a to the pot- “fry” for about 5 minutes turning often (add more liquid to keep from scorching). This kinda gives the chicken a browning bedsides leaving some goodness in the bottom of the pot.

Add all the seasoning to the pot giving it a good stir –it should smell good

Add the carrots and rest of the chicken broth plus some water to fill the pot 2/3rds full- let this simmer until chicken is done. Remove chicken so it can cool down.

Add the can of diced tomatoes (juice and all), the diced beet and potatoes to the pot. The level should be at least 2/3rds full. Let this simmer until potatoes are almost done.

While the potatoes are simmering, cut or tear up the chicken. This also would be a good time to do a taste test to see if you need to add more seasoning to the pot.

Add the chicken and frozen veggies to the pot and let simmer until the frozen veggies are done.

There you have it, a delicious tasting and very visual appealing chunky soup. We paired this with a savory bread and a glass of wine (oops the wine part was on my do to next time list).

Suggestions:

You can add more veggies like leafy green ones, leave out the meat, change the meat choice, use tomato juice instead of water or broth but not both….this is the type of soup that is so easy to modify I say go for it and let us know what you think , changed or to just share ideas…..we’re game.